Setting up EdgeMAX Devices for OTE IPv6
July 7, 2016
I spent some time yesterday trying to make an EdgeMAX device, namely the EdgeRouter X SFP work in an OTE ADSL connection. Setting it up is very easy, however I found IPv6 a little bit trickier to implement properly, therefore I am writing this as a documentation (for future {generations, reference}).
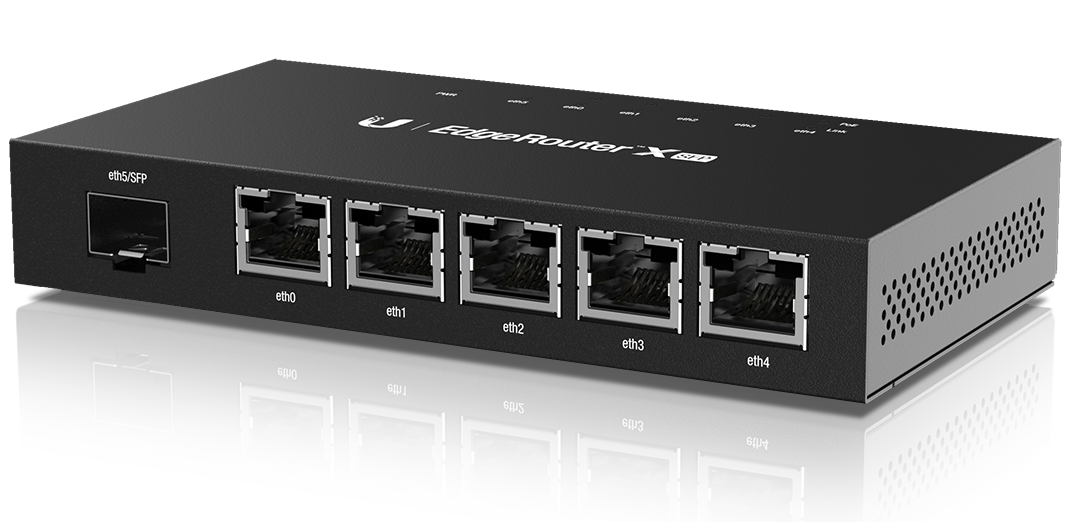
This tutorial is simple and works on all EdgeMAX Devices like the EdgeRouter X, EdgeRouter Lite, EdgeRouter PoE, EdgeRouter, and the amazing EdgeRouter Pro. The only thing it needs is the CPE provided by the ISP, in this example a ZTE H108NS by OTE, and PPPoE credentials with support for IPv6.
Let me say a few things first about EdgeMAX, UBNT’s OS for their routers and switches. It comes with all the models mentioned above, which start at € 50,00 and is based on Debian. The version I am using is 1.8.0, which is based on Wheezy (7). It features Vyatta, which is popular in small and large network equipment manufactures alike, so if Googling for something and “EdgeMAX” does not yield anything useful, you can Google it again with “Vyatta” and get responses. This has happened to me and I found answers from Brocade that worked perfectly line. EdgeMAX is not only a Debian-based system but it also has ssh enabled, as a user in the sudo group, which means you essentially have root access to the box. It also comes with a UI, which does not cover all features supported, but can help with the basics. In order to ease administration, they added a “Config Tree” which allows you to configure anything that you can do from the command line via the UI, however not as easy as it would be with a menu.
In general it is a very good OS and one of my favorite for a router. It has many features that you will most likely never need such as OpenVPN, Site-to-Site IPSec, MPLS, VPLS, BGP, OSPF, etc. In addition to that, it receives updates, is built with (some) security in mind, and can do a lot of things at a very small price.
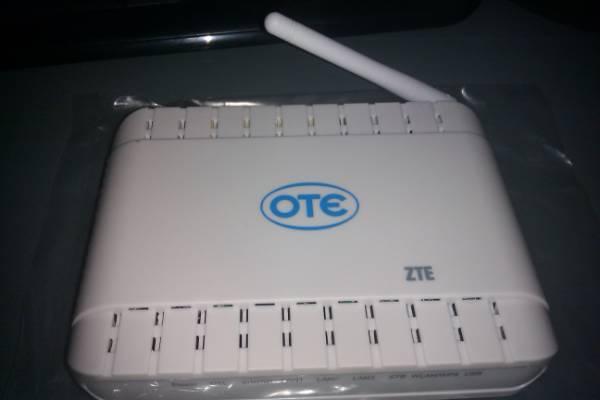
Now let’s talk about the other component used. It is the ZTE H108NS CPE provided by OTE to some of its customers. It is a essentially a Modem + Router + Switch + Access Point kind of thing that is very common in Greece, only with the exception that this particular unit also seems to support 3G.
Currently, the way it works is that this CPE connects and obtains a Public IPv4 and a Public IPv6 address via PPPoE. In addition to that, it has a LAN interface, connected to the local switch and a WLAN interface. These last two interfaces are bridged and the bridge interface has your local IP address, 192.168.1.1/24 by default. A DHCP Server is available that hands out local addresses and NAT is in place for IPv4 traffic.
The first way we could approach the problem is plug the EdgeRouter in one of the LAN ports, and then run NAT there, so there are two NATs between a client device and the Internet. While this works and is easy to configure using the built-in UI only, we are going to do it properly:
Use only the Modem function of the CPE and let the EdgeRouter run PPPoE. In addition to that, we’ll see how we can also use the Access Point feature in case we do not have a better one.
Let me start by saying that my CPE also supports TV, more specifically OTE’s subscriber-only TV, so LAN4 is marked as “STB” and the LED in the front is also marked “STB” accordingly. Since I do not have that service currently, I was not interested in making it work.
The first thing that has to be done is of course to log-in to the CPE administrator interface. This can be done by visiting 192.168.1.1 in any browser. There is HTTP Authentication in place and the credentials can be found under the device. After logging in, we’re interested in what’s available at the “Interface Setup” tab, and more specifically the “Internet” subcategory.
This page contains the default settings of the CPE which are set to PPPoE, etc., etc. Since I did not want to mess with these settings, just in case, and I did not use the TV feature of the device, I decided to do a “hack” and select “PVC 1” from the top of the page, which is like a second interface of the modem. This hack allows me to disable the TV and replace it with my EdgeRouter-based PPPoE connection while maintaining the old config for easy switching.
I disabled the “PVC 0” Circuit by setting the Status to Deactivated. This of course disconnected me from the Internet. I then switched to “PVC 1” and changed the configuration to the following:
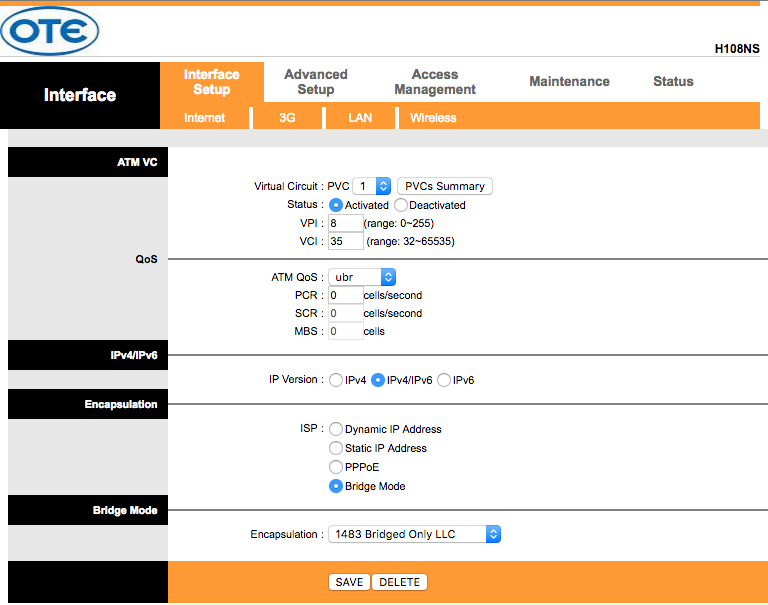
Just make sure you also change 36 to 35 in the VCI. What this setting does is it bridges the modem interface with LAN4, the “TV” port. That means that any device that connects to LAN4 can use PPPoE and communicate directly with the ISP, in this example, OTE.
However, this action has an undesired side effect, which is that the “Internet” LED goes Red, because the CPE cannot connect to the Internet using its modem. This cannot be fixed but personally I am also fine by that.
So by now we have set our CPE in bridge mode between the modem and LAN4, and we also have a Private Subnet, namely 192.168.1.1/24 in the remaining interfaces, including Wireless. If you are using a dedicated Access Point, first, good job, and second, you can disable the Wireless from the respective subcategory.
Now it’s time to set up the EdgeRouter X SFP. I assume that you have set a user password. When first used, the router offers you to use a Wizard, which includes two WAN interfaces and load balancing, one WAN interface, etc. In this tutorial I will be skipping it and configuring everything manually, but feel free to use them if you need to. The final result must be one LAN interface with a range different than 192.168.1.0/24.
If you decided to do it manually, just like me, here’s how you do it:
First, you need to find the interface you want to use from the “Dashboard” tab. We will be using eth1 in this example. By clicking on “Action” and then “Config”, you will see the Interface configuration popup:
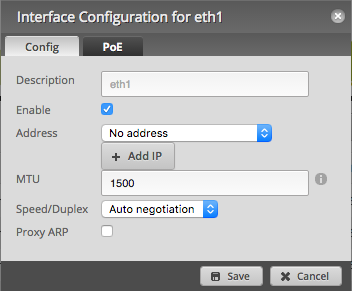
Change the “Address” dropdown to “Manually define IP Address” and then enter a private IP range, like for example 192.168.192.168/24. This setting will give the router the internal IP address 192.168.192.168 and then configure the subnet mask to 255.255.255.0, which means any address from 192.168.192.0 to 192.168.192.255. Keep in mind it must be something different than 192.168.1.X if you’re using a separate AP.
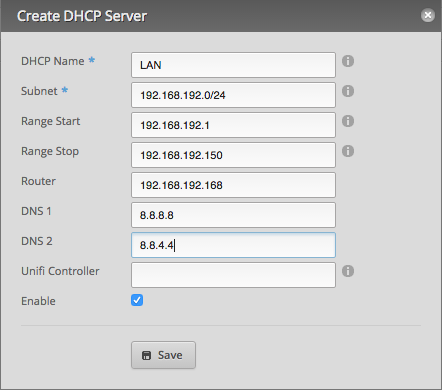
After you’re done, go to the “Services” tab and click the button “Add DHCP Server”. This will add a DHCP server so the clients connected to the local network receive an IPv4 address.
Change the settings in the pop-up to something sane, like for example the settings below:
Now you should have a Local Area Network and connecting your computer via Ethernet to eth1 should give you an IP Address. However, the Internet access is still not set up and there’s no word of IPv6 yet. Let’s see how we can make these work.
Go back to the “Dashboard” tab and click the “Add Interface” / “Add PPPoE” button. You will see a new pop-up requiring information about the connection. Go ahead and complete it:
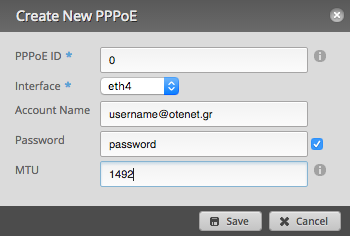
The PPPoE ID can be any number between 0 and 15 but must be unique, in case you have more than one PPPoE connection. The interface I chose is eth4, which is the last RJ45 interface available. You can pick any other interface you want, but before you click “Save” make sure it is connected with an RJ45 cable to the LAN4 port of the ZTE CPE.
A few seconds after you save the connection and assuming you have Deactivated the PVC 0 of your CPE, you will see a Public IPv4 Address in the newly created pppoe0 interface:

That means that the router can access the IPv4 Internet and that it has an IPv4 address of its own. Now of course we need to provide access to the rest of the devices in our network. In order to do this we need to enable NAT from the “Firewall/NAT” tab and more specifically the “NAT” subcategory.
Click “Add Source NAT Rule”, and then enter a Description, like “OTE”, click “Enable”, select pppoe0 as the “Outbound Interface”, and finally in “Translation” select “Use Masquerade” to make it look like this:

If all went well all your LAN devices should be able to browse the IPv4 Internet now. They will all share the IP Address you see in the pppoe0 interface. But we’re not there yet. We lack an important feature and that is IPv6. Please keep reading the tutorial to enable it, as it can be useful and make your Internet experience faster.
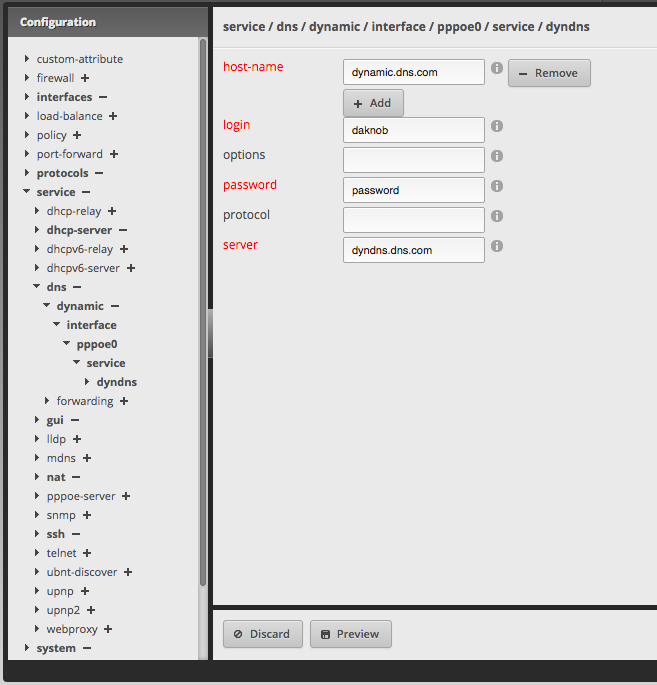
In version 1.8.0 of EdgeMAX, IPv6 Support from the UI is limited for what we are trying to do: dynamically assign IPv6 Subnets since OTE does not yet provide static addresses to all users. We are going to use the “Config Tree” tab which allows us to directly edit the device’s configuration file without needing to ssh into it.
Navigate to interfaces/ethernet/eth4/pppoe/0/ from the left hand side of the screen. When you’re there, click ipv6, then address, and then the + icon on autoconf. This will enable IPv6 on the pppoe0 interface and allow the router to browse the IPv6 Internet. But just like before, we need to bring this functionality to the LAN clients, too.
In the previously mentioned path, click dhcpv6-pd and then the + icon near the prefix-only. Finally, click on pd, then type 0 in the text box to your right, and click “Update List”. Now click on the 0 that appeared in the tree on the left and type /56 in the prefix-length to the right. Then click on interface and type eth1 in the box. If you have more interfaces click the “Add” button and add as many interfaces as you want. After you’re done, click “Update List”. Now click on your interface(s) and set the host-address to ::1. This means that your router will have the first IP address in this subnet. After that, set the prefix-id to ::10.
Currently OTE provides each customer an IPv6 /56 block. That means you get an address like XXXX:XXXX:XXXX:XXCC:CCCC:CCCC:CCCC:CCCC. With X I have marked the fields that are dynamic and controlled by OTE and with C I marked the fields that can be customized. That ::10 we entered before will assign the subnet XXXX:XXXX:XXXX:XX10:SSSS:SSSS:SSSS:SSSS to the interface we selected. As you can see you can set this to anything from 00 to ff, which are 256 possible subnets. You just need to make sure they will not overlap with subnets assigned to other interfaces.
Finally, set the service to slaac and click the “Preview” button below. It will show a pop-up with the changes you made, feel free to click “Apply”. Now the EdgeRouter will update the configuration that uses and then let you know when it’s done.
However, in order for the IPv6 changes to take effect, we need to restart the PPPoE Interface. This step was not clear to me and took me some time to figure it out.
You can do this either physically by disconnecting the cable, or in a more sophisticated way, by clicking the “CLI” button, logging in, and then issuing:
disconnect interface pppoe0; connect interface pppoe0
Now you should start obtaining Public IPv6 Addresses in all your LAN devices. Congratulations, you are currently using your CPE as a modem and your EdgeRouter as your main router. You are also browsing the IPv4 and IPv6 Internet. Here are some things you may want to do now:
- Set up a stateful IPv6 firewall to prevent connections to your devices.
- Make your modem accessible for future configuration
- Get some rest since you did enough already
The first list item is not in the scope of this tutorial, however I will be showing you how to do the second one. I guess you’re already familiar with the third item ;-).
Your OTE CPE is using 192.168.1.1/24 in the bridge interface, which means this IP Address can be accessed from LAN1, LAN2, LAN3, and of course, WiFi. What you need to do is connect an ethernet port of the EdgeRouter to one of the LAN{1..3} ports on your CPE. After that, go the “Dashboard” and set the “Address” to “Use DHCP”.
Now there are two ways of making it work, the easiest of which is to go back to the “Firewall/NAT” tab and repeat the previous instructions in order to add a “Source NAT” with the “Outbound Interface” set to the ethernet port in which the CPE is connected. After you’ve done that, you can visit 192.168.1.1 in your browser from your LAN and be able to access the administrator interface of the CPE.
Now if you have followed the instructions you should be able to:
- Access the IPv4 Internet using your router’s Public IP
- Access the IPv6 Internet using your computer’s Public IP
- Access the CPE Web Interface using its local IP Address
But all that assuming you have a dedicated Access Point. What if you don’t? What then? Well. You have to make use of what you have, for example that CPE. What you need to do is pretty much the same as above, with one different. Instead of using eth1 for the LAN and setting a new IP Address in the “Dashboard” tab, Manually Define the IP Address to 192.168.1.2/24, then set the DHCP subnet to 192.168.1.0/24 and the starting and ending addresses as well as the router to 192.168.1.10, 192.168.1.250, and 192.168.1.2 respectively. Finally, disable the DHCP from the “LAN” tab of the ZTE H108NS and don’t follow the last step about CPE connection. You just need to connect your Edge Router to the CPE on eth1 and then connect to the WiFi Hotspot of your CPE.
In that last configuration you should have one cable from LAN4 of the CPE to eth4 and one from LAN1 to eth1. You should also have two interfaces, pppoe0 and eth1. pppoe0 should receive automatically and IPv4 and an IPv6 address while eth1 should have 192.168.1.2/24 set statically. If you need to connect over WiFi, you can use the ZTE’s AP, and if you have to connect over Ethernet, you can use the remaining LAN ports on the CPE. Just keep in mind that the H108NS is an 100 Mb/s device so you will not benefit from the 1 Gb/s capabilities of the EdgeRouter. There is an alternative method that involves using the switch0 interface but it is also out of scope of this tutorial.
Thank you for reading and I hope you found this blog post useful. Let me know in the comments below if this worked, or if it didn’t, what was the problem, and I will do my best to help.