Configuring COSMOTE VoIP on your PBX
December 1, 2021
About a month ago, for technical reasons, I was no longer able to use COSMOTE’s CPE in a landline connection with a traditional telephone. I could either spend time and money in the middle of a pandemic, to have contractors visit and route some cables, or, I could take the opportunity and do something I’ve been hearing about recently, which is to switch the service to VoIP, and terminate it to my own PBX.
Since I wasn’t familiar with telephony and the latter was going to be much more expensive, it was a clear choice for me. I decided to set up my own PBX, and move the phone number to this service. I thought it was going to be a day of work max, and then some maintenance here and there. This turned out to be false, so I’m documenting my adventure here, in hope that it is useful to others.
Setting up a PBX
A PBX is a telephony system that handles incoming and outgoing calls and connects to other devices (phones at a business, or in this case a house) and providers (like OTE / COSMOTE). There are hardware and software solutions, but I wanted something simple and easy to manage that would have most functionality and wouldn’t take much of my time.
The most popular choice seems to be FreePBX, but I had some issues configuring it for my use case and it’s designed with some assumptions in mind that did not fit my particular usecase. For this reason, I ended up using VitalPBX which supports less features, but fits my case better. They are both Web UIs + a utility collection for Asterisk under the hood, which I wouldn’t dare to touch by hand.. It would violate the low maintenance and low effort principle.
Setting up VitalPBX was very easy, as it came with an ISO that you simply run in a virtual machine. I had it running quickly, and I spent some time to configure it to my needs. I also created two extensions (internal phone numbers, e.g. 3-digit ones) and added them to my phone and laptop, and I tried calling between the two. It worked fine, and I was pretty happy with that.
Configuring the trunk
When you connect your PBX to an existing telephony provider, so you can have access to the rest of the world, you typically use a SIP trunk. Effectively your PBX becomes an extension (device) to a provider’s PBX and all calls from and to you are sent over this connection.
This requires getting an account, so you can authenticate against the server of the provider. You can have multiple providers and multiple phone numbers per provider. Depending on how smart your PBX is, you can configure it to call national numbers over your COSMOTE line (which could be flat-rate) and use a less expensive provider for calls abroad.
So let’s begin!
Step 1: Don’t do it
I cannot stress this enough, but my experience was not easy. COSMOTE provided no documentation, no settings, and I could only find some forum posts online of people trying to get it to work, or outdated instructions that failed. Moreover, if you decide to do this, there’s no technical support from COSMOTE, and they’re not responsible for any calls you make abroad that can rack up tens of thousands of euros of bills, e.g. by having your PBX hacked. This is fairly common and there are many cases of people that saw these bills on their post-paid plans.
If you still want VoIP, especially if you are a company, I can’t recommend Modulus enough. It’s a Greek provider with great support and very low rates. If I decided to go with them (I may, in the future), I would probably have everything running in less than a day, and it would be working fine. Seriously, just use them instead. Their support is so good, that one of their engineers, Kostas, spent so much time with me on the phone trying to get this thing to work, despite being a competitor in theory. I’m not sponsored by them, just impressed.
Step 2: Get your OTE / COSMOTE Credentials
In order to be able to connect to COSMOTE’s servers, you need your account that is tied to your phone number. The company does not give it to you along with e.g. the PPPoE credentials and there’s no option on their online portal to request this information. You need to call their technical support department, get transferred a few times, until you speak to someone who can initiate the process. If you don’t want to talk over the phone, you can login to MyCOSMOTE and do it over chat.
They’ll ask for a mobile phone number, and they’ll send you your credentials there via SMS. After they send the SMS, you allegedly have 15’ or 30' (depending on who you ask) to enter these credentials to your PBX, otherwise you need to request them again. They will typically call you a bit in advance to make sure you’re ready for the SMS.
Make sure to disable the VoIP account completely on your CPE (e.g. the Speedport) because this connects automatically, and allegedly rotates your credentials every time.
My SMS took 3 or 4 days to arrive and I entered the credentials around 2 hours after I got it, and it still worked. Also, I found that my account wasn’t getting a new password with the CPE on, but your mileage may vary.
Your username will be in the form of +302XXXXXXXXX@ims.otenet.gr.
Step 3: Configure the SIP Trunk
Go to your PBX’s trunk settings, create a new one, and use the following
values. For VitalPBX you need to go to “PBX” -> “External” -> “Trunks”. Each
PBX has different names for each value, so try to find the closest match. You
also need to use SIP (chansip). I could not get PJSIP to work for my
setup.
DTMF Mode: RFC2833
Local Username: +302XXXXXXXXX
Remote Host: ims.otenet.gr
Remote Port: 5060
Local Secret: PassWorD
Insecure: Port, Invite
Allow Inbound Calls: Yes
Remote Username: +302XXXXXXXXX@ims.otenet.gr
Remote Secret: PassWorD
From User: +302XXXXXXXXX
From Domain: ims.otenet.gr
Overwrite CID: Yes
Trunk CID: +302XXXXXXXXX
This will probably generate a Register String of:
+3023310XXXXX:PassWorD:+3023310XXXXX@ims.otenet.gr@ims.otenet.gr:5060/+3023310XXXXX
I know that FreePBX has completely different names, and some of the above may even sound new / unknown to an experienced Voice Engineer, so here’s the autogenerated Asterisk configuration file. Just try different things with yours until it either works, or you get something like that:
[+3023310XXXXX]
context=trk-2-in
description=COSMOTE-Tutorial
dtmfmode=rfc2833
allow=!all,alaw,g722,g729
nat=no
host=ims.otenet.gr
port=5060
secret=PassWorD
insecure=port,invite
type=friend
defaultuser=+3023310XXXXX@ims.otenet.gr
remotesecret=PassWorD
fromuser=+3023310XXXXX
fromdomain=ims.otenet.gr
qualify=yes
I had to bruteforce the above. I couldn’t find any documentation from the
company, so I just tried things in random places until I got the PBX to
register successfully. Add an @ims.otenet.gr here, delete this field there,
… There’s a very good chance that half of that can be redundant, or too lax,
or wrong, or not needed. What I know is that after trying tens of combinations
(and getting banned / rate limited more times than I can count), I ended up
with this, and it works, and I will avoid touching it probably until it breaks.
That’s the problem with this setup. It’s too brittle, and I don’t like the fact
that I don’t understand why it works, and I can’t experiment with it because I
may get blocked.
If you want to play with it, during this trip I learned about sngrep, which
comes preinstalled with VitalPBX. It captures packets from the network, and if
they’re SIP packets it will decode them in an interactive GUI and will greatly
help. You can see all the traffic, all the SIP headers, and it helps you see
things that you can’t normally do. Like the fact that your PBX sent 200 UDP
packets to COSMOTE, and received no response to any of them.. ;) Thanks Kosta
for teaching me this tool!
In case you don’t use VitalPBX, or have an old version, here’s something I
learned that may be useful to you. If you look at the connection string above,
you can observe that it’s a bit weird. It has @ims.otenet.gr two times. This
is because their IMS (PBX) does not accept a simple username like
+3023310XXXXX but it needs to be +3023310XXXXX@ims.otenet.gr. That being
said, the first @ims.otenet.gr is part of the username, and the last is the
host you communicate with. Apparently some implementations don’t handle two @
signs well and break, or convert one into an escape sequence. If yours does
this, then I don’t know if you can register at all. You need to pass this exact
username to this exact host. Another reason to maybe look at what Modulus is
offering instead, and avoid dealing with all that.
Step 4: Inbound & Outbound Rules
Now that your PBX connected to COSMOTE’s, you need to tell it what to do when it receives a call from this connection, and what to do when you place a call to a device outside your server (e.g. to a public phone number). This is handled with inbound and outbound rules respectively.
The inbound is fairly straightforward: You create a rule with your phone number as the DID (the call recipient) and then you choose what you want to happen when this rule is matched. For example, you may want an extension (a local device) to ring, or play an announcement, have an IVR menu, a queue, anything. You can even create different rules that also match the CID (the number that calls) so if you call from your mobile phone it does something different than if anyone else calls you. It’s the magic of software. The possibilities are endless.
For the outbound routes you need to make some decisions. You create a new one, select the trunk created previously, and now you need to enter some dial patterns. These are rules that define when this trunk (and therefore your COSMOTE service) is used. VitalPBX offers 4 fields:
Prepend
This is a string that is added in front of the number you called. For example,
if you don’t want to dial +30 every time, you can have the PBX prepend it to
all calls that match this rule.
Prefix
This is a string that is removed from the front of the number you dialed. If
it’s set to 1 and you call 1911, then the PBX will call 911. You can use
this if you want to have to add a number before any external call (e.g. call
9, and then the number), or you can use this if you have multiple trunks and
you want to allow the user to select which one to use: call 9<number> to use
COSMOTE, 8<number> to use Twilio, etc.
Pattern
This is the pattern of the number you are calling that has to match this rule.
It follows the Asterisk pattern so an X for example means any number from 0
to 9. If I enter 69XXXXXXXX then this rule will match all Greek mobile phone
numbers.
CID Pattern
This is similar to Pattern, but is matching the person calling. If for
example your house’s extension numbers are 1000-1999 and your friend’s (that
you let use your PBX) is 2000-2999, then you can add a pattern 1XXX for
this trunk and a pattern of 2XXX to your friend’s trunk, so depending on who
is calling, it automatically picks the right number. Instead of you or your
friend this can be different departments, e.g. Support and Sales.
My rules
What I ended up with is something like the following. Everything after the #
is a comment. The fields appear in the order described above.
+30,,69XXXXXXXX,1XXX # Greek mobile phone numbers
+30,,2XXXXXXXXX,1XXX # Greek landlines
+30,,137XX,1XXX      # Tech Support numbers (toll free)
,,+410XXXXXXXXX,1XXX # Allow calls to Switzerland
You can keep adding any rules you want below that to numbers you may be
calling. If you don’t want to limit the choice at all, and you want to allow
everything, then the pattern ! matches “zero or more characters”. This allows
you to call anything, but I don’t recommend it in a post-paid plan. If someone
manages to log in as an extension, they can call everything and you can get a
very large bill. Of course, the 1XXX part (CID Pattern) above is an example.
If you leave it empty, it matches all callers.
Configuring RTP
In this setup you use two protocols: SIP & RTP. The first one simply establishes a call, registers a device, and is the “control plane”. The actual call data (voice) goes over a different protocol, RTP (the “data plane”). You receive or send a SIP message that helps the other side agree on a method of communication (e.g. RTP over this IP / Port). In order for everything to work you need both your control plane and your data plane to be functional. If SIP is the only thing working, then you can establish calls to others, but you won’t be able to hear them, or they won’t be able to hear you, or both (depending on the data plane situation). And since RTP is UDP, your device and the PBX cannot know that something’s wrong. They have no way of telling if you are heard.
My setup is a bit unusual: I don’t have any IPv4 or IPv6 NAT in my network, at
any point, and all my devices receive public addresses. That means that my PBX
has a non-RFC1918 IP address. If I try to talk to ims.otenet.gr over a
non-COSMOTE address, then all the traffic is dropped. This is probably done for
security reasons as well as the fact that OTE’s phone system was probably
designed to work internally. My PBX needs to talk to theirs via their IP
address.
One way of getting around this issue is to route all traffic from the PBX’s public IPv4 address via COSMOTE (and NAT it). This will ensure that it can talk to COSMOTE, but it will break everything else (e.g. updates, ssh, my extensions, etc.). So policy/source based routing can’t get us very far. I could only route COSMOTE’s traffic from the PBX, but then I can’t register my softphone when I’m on their 4G network..
The solution I ended up with was finding which IP addresses their IMS uses, and
route only these via one of their IP addresses. This wasn’t easy, I likely
didn’t do it in full, and it has high potential of breaking in the future
without notice. Brittle setup.. I started with a DNS query to ims.otenet.gr.
This returned an IPv4 address, and no IPv6. I shouldn’t complain, it makes
things easier for me..
I routed this address over COSMOTE, NATed all traffic to one of their IPs, and registering was successful. However, when I tried to make any call, nobody could hear me, and I couldn’t hear them. That means that RTP was having issues.
By carefully inspecting the traffic, I noticed that they gave me a different IPv4 address for RTP that the one I used for SIP. I guess that makes sense. After some research, I determined that I needed to route the following IPs to them:
195.167.16.0/23
195.167.21.0/24
195.167.22.0/24
There may be more blocks, but at least for my area, most calls have
bidirectional voice :) Their RIPE object has a netname of IMS-USERS which
suggests that my findings are correct.
If you have a more normal setup, then you don’t need to do this at all, as all your traffic goes via them anyways. Everything will work out of the box. However, I would argue that many companies may find themselves in a multi-homed setup. I had to hardcode these addresses, so if they change, or more are added, my service will break, or even worse, silently degrade. However, I’m okay with this tradeoff. Famous last words. In case I need to remind you again: get a proper VoIP provider!!
In order to be able to hear audio sent to your direction, in a typical setup
you may need to forward the UDP ports for RTP to your PBX. I think that the
COSMOTE CPE / Router / Modem / … thing does not allow you to port forward
ports 10000-? and will complain (because it uses it for RTP itself). What you
can do is forward 15000-20000 instead of the default 10000-20000 and change
the VitalPBX settings to use these ports for RTP.
Fixing the Caller ID
After completing the steps above, I had a functional PBX. I could receive calls
on my phone number, make outgoing calls, and everything was working fine. The
only issue was that all calls I received were not including a caller ID. By
closely examining the INVITE of OTE to my PBX, and more specifically the
From header, we can see that:
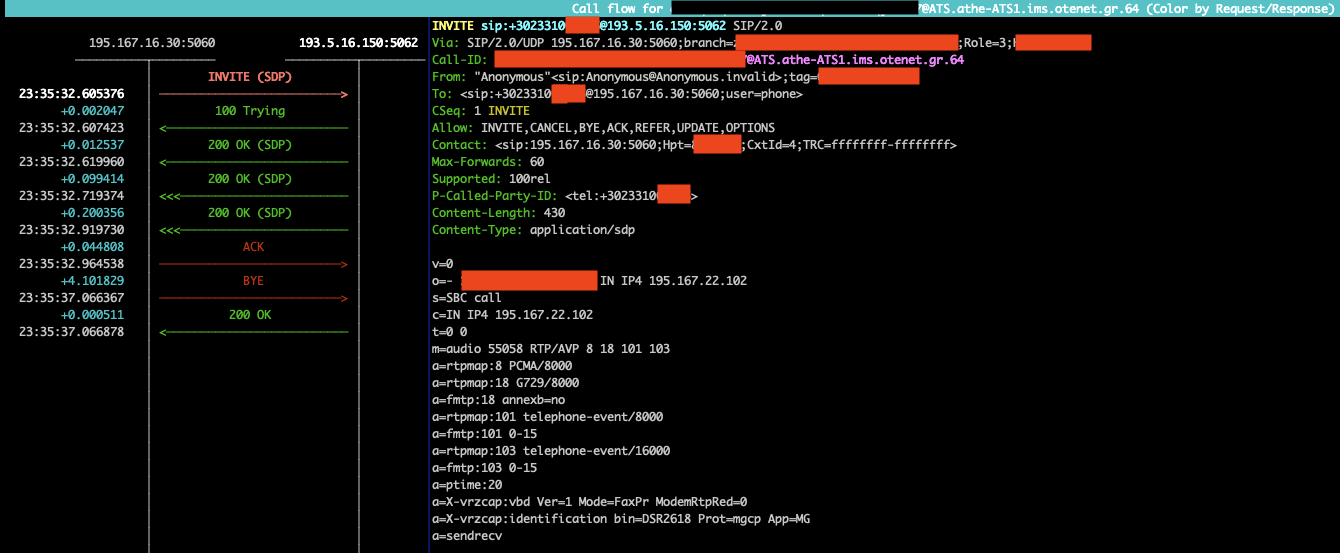
Instead of who’s calling, they’re sending:
"Anonymous" <sip:Anonymous@Anonymous.invalid>
Like e-mail, the part within the quotes is the text, which could be “COSMOTE”,
and the part within the <> is the address. That meant that I was receiving
this just fine, it was them that didn’t populate it / set it.
I tried to figure out why, and then I found out that they charge a small amount of EUR per month to have Caller ID. This is a paid service, on top of your monthly contract. So if you’re not paying for it, you can’t get it.
But I had it before, in my analog phone.. I looked into their portal, and I could see that this was included in my account. So something else was going on..
I didn’t care much about it, so I didn’t spend a lot of time, but after a conversation I had with Kostas, he asked me to try a SIP ALG on the device doing the NAT to COSMOTE. Let’s take a look at what this means:
When someone sends an INVITE to another device via SIP, to initiate a call,
like the one above, they tell the other side where to “meet” for RTP. When you
register to a provider, you also send your IP address of where they can find
you. However, since the end-to-end connectivity principle does not exist in the
IPv4 world, due to NAT, the address my PBX thinks it has (it could also be
192.168.X.X) is not the one I am really at. The provider’s IMS can’t reach me
here. So when I’m sending SIP packets with my address, I need to change it to
the public IPv4 that I am contacting COSMOTE with. Otherwise, they can’t talk
to me. Probably most PBXes send an RFC1918 address, mine sent a public IPv4.
What needs to happen is that someone needs to replace this address within the SIP packet from the private (or non-OTE one) to the PPPoE / WAN address that communicates with the IMS. This can be done with an ALG, or Application Layer Gateway. It inspects all the traffic and alters what needs to change for everything to work.
The interesting thing is that everything worked just fine before: probably COSMOTE didn’t use the SIP packet’s address but instead the one that contacted them. Or maybe I was lucky and they were happy to send RTP to an IP that wasn’t theirs.. I didn’t capture any packets so I don’t know why voice worked before.
After enabling ALG on the router responsible for NATing, the Caller ID was visible again. I don’t know why, that’s another part I can’t explain, and maybe it was a coincidence, but it seems to work now.
Conclusion
Overall, this took tens of hours of troubleshooting, bruteforcing, hoping I don’t have to call tech support, etc. But the main goal was achieved:
I learned a lot about VoIP. I finally got a better idea of how these systems
work in depth, under the hood, I became comfortable with the Asterisk
configuration files and CLI, the SIP and RTP format, sngrep and debugging
problems, and so much more. I’m not a Voice Engineer, I don’t plan on becoming
one, and I certainly don’t know enough, but it was very interesting to dive
into such an educational experience, courtesy of COSMOTE!
The secondary goal, which was to have a working phone, is “achieved”. I have something that works today, somehow. I can’t explain all the parts, there’s a chance things can break, and there are so many things I don’t feel comfortable “using in production”.
I don’t think I would do this again. Now that I obtained some knowledge, I would just go to a “normal” SIP trunk provider and have a production-ready and stable system running in probably under an hour. I would only do this if I had to, and probably by eliminating the public IP part of it :)
I can’t thank Kostas enough for the very large amount of hours he spent with me, troubleshooting together, teaching me things, and being extremely patient with the tremendous number of questions I had for him as I was learning along. Thank you!
I hope you find this guide useful, should you be unwise and don’t follow Step 1. As I said, I’m not an expert, that’s what I managed to figure out and learn in a short period of time. All the explanations here are my understanding, and there may be omissions, inaccuracies, and oversimplification, none of which is probably on purpose.
The Telephony World
I didn’t want to add this part earlier, as it’s unrelated. I wanted to include some of my observations after getting a glimpse of a new area.
First of all, IPv6. It seems that it is far less deployed here. In the very few places I found it, it was lacking features compared to IPv4. Even for more advanced setups with custom SIP / RTP implementations.
Then, TLS. SIP can be done over TCP, UDP, and TLS. The default everywhere seems to be UDP. In the very few places where I found TLS, it was more difficult than it had to to set up, lacked features, wasn’t working well, or at all, and in general was a second or third class citizen. Even worse with RTP, with its more secure version SRTP. Especially in softphones.
Finally, complexity. There’s a lot. And I still haven’t touched anything more advanced, I only did the basics. It was very interesting though. If I wanted to draw a networking parallel, I only set up a SOHO router and did NAT. Imagine if I had to work with BGP.. :)